Setting up a CNC Router can seem daunting for beginners, but with a clear step-by-step approach, you can get your machine ready for precise and efficient cutting, carving, or engraving. Whether you’re a hobbyist or running a small workshop, understanding the setup process ensures safety, accuracy, and long-term performance of your CNC Router. This guide will walk you through the essential steps for getting started.
Understanding Your CNC Router
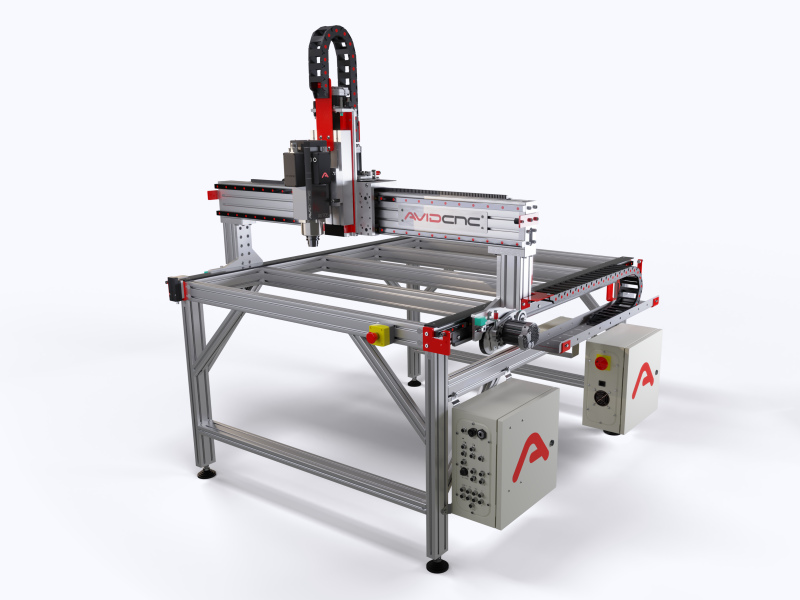
Before diving into the physical setup, it’s important to understand the components and functionality of your CNC Router. A CNC Router is a computer-controlled cutting machine capable of carving materials such as wood, plastic, metal, and composites. The primary parts of a CNC Router include the spindle, the gantry, the cutting bed, stepper or servo motors, controllers, and software interface. Familiarizing yourself with these components will help you navigate the setup process more efficiently and troubleshoot potential issues later.
Additionally, you should review the user manual that comes with your CNC Router. Every machine has specific requirements for assembly, power supply, and software compatibility, which can vary depending on the brand and model.
Choosing the Right Workspace
Selecting an appropriate workspace is crucial for both safety and efficiency. Your CNC Router requires a stable, flat surface to operate correctly. Avoid areas with vibrations or uneven flooring, as these can compromise cutting precision. Ensure that there is enough clearance around the machine to allow movement of the gantry and to handle large material sheets comfortably.
Ventilation is another important factor. CNC Routers generate dust and sometimes fumes, depending on the material being cut. Installing dust collection systems or using machines in well-ventilated areas will protect both your health and the longevity of your CNC Router. Adequate lighting is also essential to monitor the cutting process accurately.
Assembling Your CNC Router
Once you have chosen the workspace, the next step is assembly. Most CNC Routers come partially disassembled, and following the manufacturer’s instructions carefully is vital. Start by attaching the base frame and securing it to ensure stability. Then, assemble the gantry and attach the spindle. Be sure to tighten all bolts and fasteners according to the recommended torque specifications. Loose components can lead to vibrations and inaccuracies during operation.
After the mechanical assembly, install the motors and the drive system. Depending on your CNC Router, these may include lead screws, belts, or rack and pinion mechanisms. Aligning these components properly ensures smooth motion along the X, Y, and Z axes. Take your time during this stage, as improper alignment can lead to errors in cutting and additional wear on the machine.
Connecting the Electrical Components
Once your CNC Router is mechanically assembled, it’s time to connect the electrical components. Begin by wiring the stepper or servo motors to the controller. Most CNC Routers use a central control board that interfaces with a computer running CNC software. Make sure the power supply matches the voltage requirements of the CNC Router and that all cables are securely connected.
Next, connect the limit switches, which help prevent the machine from moving beyond its mechanical range. These switches are critical for protecting both the CNC Router and the material being cut. If your machine has an emergency stop button, ensure it is functional and easily accessible.
Installing Software and Drivers
A CNC Router requires specialized software to translate digital designs into precise movements. Start by installing the drivers for your controller on your computer. Then, install the CNC software, such as Mach3, GRBL, or a proprietary application provided by the manufacturer. Familiarize yourself with the software interface, including features for setting zero points, controlling spindle speed, and adjusting feed rates.
Importantly, verify the communication between your CNC Router and computer before running any cutting operations. This step allows you to confirm that the software correctly recognizes the machine axes and that commands from the computer translate into actual movement.
Calibrating the CNC Router
Calibration is essential to ensure precision and repeatability. Begin by checking the alignment of the X, Y, and Z axes. Use measuring tools such as a dial indicator, square, or calipers to confirm that the router moves accurately according to the commands. Adjust the mechanical components or software settings as necessary.
Next, set the spindle height and tool offsets. Each cutting bit has a different length, and setting the correct offset ensures that your cuts are accurate and consistent. Perform a test run on a scrap piece of material to verify the calibration. This dry run helps identify any misalignment or software settings that need adjustment before working on valuable materials.
Safety Precautions
Safety should always be a top priority when operating a CNC Router. Always wear protective eyewear, ear protection, and a dust mask or respirator when cutting materials. Keep hands and loose clothing away from moving parts, and never leave the machine unattended while it is operating.
Additionally, make sure that fire safety measures are in place, especially when cutting flammable materials such as wood or plastics. Having a fire extinguisher nearby is a simple but effective precaution. Regular maintenance, including lubrication and cleaning of the CNC Router, also reduces the risk of accidents caused by worn or malfunctioning components.
Running Your First Project
After setup, calibration, and safety checks, you’re ready to run your first project. Start with a simple design and inexpensive material to minimize waste if adjustments are needed. Load the design into your CNC software, set the zero point on your material, and verify that the spindle speed and feed rate are appropriate for the material type.
Monitor the machine closely during the initial cuts. Pay attention to unusual vibrations, noises, or deviations in cutting depth. Adjust settings as necessary and take notes for future projects. Over time, you will develop a workflow that maximizes the efficiency and accuracy of your CNC Router.
Regular Maintenance and Troubleshooting
Once your CNC Router is operational, regular maintenance is key to long-term performance. Clean the machine after each use to remove dust and debris, which can interfere with motors and bearings. Lubricate moving parts according to the manufacturer’s recommendations, and inspect belts, screws, and other components for signs of wear.
Troubleshooting is also part of owning a CNC Router. Common issues include missed steps, alignment errors, and communication problems with the software. Keeping a log of settings, material types, and any adjustments can help you quickly identify and resolve problems, ensuring consistent results for every project.
Conclusion
Setting up a CNC Router may seem challenging at first, but by following a structured, step-by-step process, you can achieve a safe, precise, and efficient operation. From understanding the components to choosing the right workspace, assembling the machine, installing software, calibrating, and running your first project, each stage plays a critical role in successful CNC Router operation. With proper care, attention to detail, and adherence to safety protocols, your CNC Router will become an invaluable tool for producing high-quality, precise work for years to come.
By following this guide, beginners and seasoned users alike can ensure their CNC Router is set up correctly and ready to tackle a wide range of projects with confidence.