
Introduction
Customizing a vehicle is an exciting way to express personal style while giving a car a distinctive appearance. One of the most popular modifications among automotive enthusiasts is installing bodykits. These exterior components can transform the look of a standard vehicle by adding sporty lines, aggressive styling, and a more personalized finish. However, choosing the right bodykit involves more than simply selecting an attractive design. Proper installation, regular maintenance, and careful material selection are essential for achieving a professional result.
For beginners, understanding the installation process and learning how to care for bodykits can make vehicle customization easier and more rewarding. Whether the goal is to create a sporty appearance, improve exterior styling, or refresh an older vehicle, following the correct procedures helps protect the investment and maintain a clean finish.
What Are Bodykits?
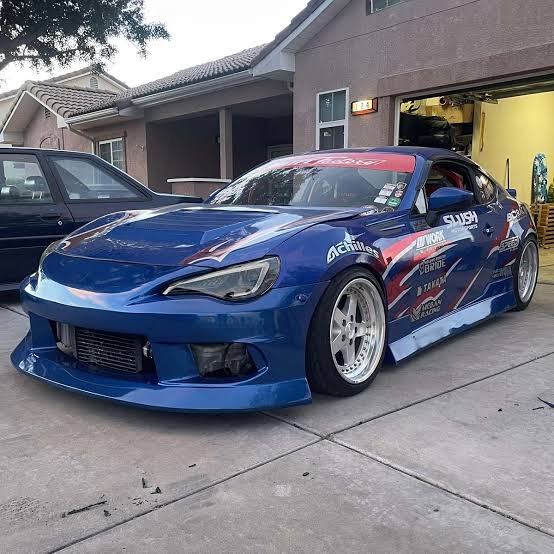
Bodykits are aftermarket or replacement exterior components designed to change the appearance of a vehicle. Depending on the design, a kit may include front bumpers, rear bumpers, side skirts, spoilers, diffusers, fender extensions, and other decorative elements.
Some bodykits focus primarily on visual customization, while others are designed with aerodynamic considerations in mind. Their effectiveness depends on the vehicle, component design, installation quality, and driving conditions.
Bodykits are available in several materials, including fiberglass, polyurethane, ABS plastic, and carbon fiber. Each material has different characteristics related to flexibility, weight, durability, appearance, and price. Understanding these differences is an important first step before purchasing a kit.
Choosing the Right Bodykit for Your Vehicle
Check Vehicle Compatibility
Before purchasing a bodykit, confirm that it is designed for your vehicle’s exact make, model, year, and trim. Even cars that look nearly identical may have different bumper shapes, mounting points, sensors, or dimensions.
A compatible kit generally requires fewer modifications and offers a better fit. Review the seller’s specifications and installation instructions, and ask for clarification if compatibility information is incomplete.
Select a Suitable Material
The material affects how a bodykit performs in everyday conditions.
Fiberglass can support detailed shapes and customized finishes, but it may crack under certain impacts. Polyurethane is flexible and can tolerate minor contact better than more rigid materials. ABS plastic is commonly used for molded automotive components because it offers a practical balance of appearance and durability. Carbon fiber is valued for its distinctive finish and lightweight properties, although it can be expensive.
Consider your driving environment, maintenance preferences, and budget before deciding.
Consider Ground Clearance
Front lips, side skirts, and rear diffusers may reduce the available space between the vehicle and the road. This can create difficulties when driving over speed bumps, entering steep driveways, or traveling on uneven surfaces.
Choose a design that suits your usual roads rather than focusing entirely on appearance. Practical ground clearance can help reduce scraping and unnecessary damage.
Preparing for Bodykit Installation
Preparation is one of the most important stages of a successful installation. Before beginning, inspect the components for cracks, scratches, shipping damage, or manufacturing defects.
Read the manufacturer’s instructions carefully and identify all the required mounting hardware. Depending on the kit, the installation may involve brackets, bolts, clips, approved automotive adhesive, or other fasteners.
Useful workshop equipment may include basic hand tools, suitable protective equipment, cleaning materials, and tools specified by the manufacturer. More complicated installations can require specialist equipment and professional assistance.
The vehicle should be parked on a stable, level surface. If it needs to be raised, use properly rated lifting equipment and secure supports according to the vehicle manufacturer’s instructions. Never work beneath a vehicle supported only by a jack.
Clean the mounting areas to remove dirt, grease, and residue. A clean surface allows components to sit correctly and helps approved bonding products perform as intended.
Step-by-Step Guide to Installing Bodykits
Step 1: Test-Fit Every Component
Before painting or permanently attaching anything, position each component on the vehicle to check alignment. Examine the edges, panel gaps, mounting holes, and contact points.
A test fit can reveal compatibility issues before they become expensive problems. Do not force a component into position if it does not align properly. Excessive pressure may cause cracks, damaged clips, or uneven gaps.
Step 2: Prepare the Original Panels
Some installations require removing existing trim, bumper covers, or other exterior parts. Follow the vehicle manufacturer’s procedures and protect painted surfaces during removal.
Modern vehicles may have parking sensors, cameras, lighting equipment, or electrical connections integrated into their bumpers. These parts should be disconnected and handled according to the relevant service instructions. If you are unfamiliar with automotive electrical systems, consult a qualified technician.
Step 3: Align and Secure the Components
Install the bodykit using the specified brackets, clips, bolts, or approved adhesives. Follow the manufacturer’s instructions for fastener placement and tightening requirements.
Avoid using unsuitable adhesives or improvised mounting methods. Components exposed to road vibration and airflow must remain securely attached. Incorrect installation can create safety risks for the driver and other road users.
For larger kits or parts that require cutting, drilling, or structural modification, professional installation is often the best option.
Step 4: Check Panel Gaps and Clearances
Once the components are attached, inspect the gaps between panels and confirm that all edges sit correctly. Check that doors, lights, sensors, and other vehicle functions remain unobstructed.
Turn the steering wheel through its normal range when appropriate to ensure that the tires do not contact nearby bodywork. Also inspect clearance around the exhaust system and other components where relevant.
Step 5: Complete Painting and Finishing
Some bodykits arrive pre-painted, while others require preparation and painting. For an even finish, the surface must be prepared using products and methods appropriate for the specific material.
Color matching is important because the same paint code can appear slightly different on new components and older vehicle panels. A professional paint shop can help achieve a consistent result.
Allow paint, sealants, and adhesives to cure for the full period specified by their manufacturers before exposing the vehicle to demanding conditions.
Maintaining Bodykits for Long-Term Use
Clean the Exterior Regularly
Road dust, mud, bird droppings, and other contaminants can affect the appearance of exterior components. Wash the bodykit with automotive shampoo, clean water, and a soft microfiber cloth or suitable wash mitt.
Avoid abrasive brushes and harsh household cleaning products that may scratch paint or damage protective finishes. Pay attention to lower panels, where road grime and debris often collect.
After washing, dry the surface gently to reduce water spots and maintain a clean appearance.
Inspect Mounting Points
Regular inspections help identify loose fasteners, damaged clips, and separating edges before they develop into larger problems.
Check the front bumper, side skirts, rear bumper, and other installed components for movement, unusual gaps, or visible damage. If a component becomes loose, have it secured correctly before driving at higher speeds.
Adhesive-mounted parts should be checked for separation, especially after significant temperature changes or contact with road debris.
Protect Against Scratches and Impacts
Bodykits may sit closer to the road than the original bodywork, making some sections more vulnerable to scraping. Approach steep driveways and speed bumps carefully, and avoid obstacles that could contact the lower panels.
Protective films or suitable surface coatings may help reduce minor cosmetic damage when they are compatible with the component’s finish. However, they cannot prevent all impacts or structural damage.
If a part develops a crack, inspect the mounting area as well as the visible surface. A professional can determine whether repair is appropriate or replacement is necessary.
Maintain the Paint Finish
Sunlight, weather exposure, and environmental contaminants can gradually affect painted surfaces. Use automotive wax or a compatible paint sealant according to the product instructions.
Before applying any coating, confirm that it is suitable for the bodykit material and finish. Carbon-fiber components with exposed finishes may require different care from painted plastic or fiberglass parts.
Consistent cleaning and appropriate protection are generally more effective than waiting until the finish shows significant deterioration.
Common Mistakes Beginners Should Avoid
One common mistake is buying a kit based only on photographs. Product images may not reveal differences in fitment, material quality, or installation requirements. Always review specifications and compatibility details.
Another mistake is skipping the test-fitting stage. Painting a component before checking its alignment can result in additional costs if adjustments become necessary.
Using excessive force, incorrect fasteners, or unsuitable adhesives can also lead to poor results. Each component should be installed according to its intended mounting method.
Beginners should avoid ignoring ground clearance and local vehicle regulations. Depending on the location, modifications may be subject to rules concerning vehicle dimensions, sharp edges, lighting, registration, or roadworthiness. Check the applicable requirements before making changes.
Finally, do not overlook maintenance. Even a high-quality bodykit can deteriorate if loose fittings, paint damage, or cracks are left unattended.
When Should You Choose Professional Installation?
Professional installation is particularly useful when a kit requires extensive fitting, paint matching, electrical work, drilling, or modification of original body panels.
An experienced installer can identify fitment problems, select suitable mounting methods, and ensure that important vehicle features remain functional. Professional support may also be valuable for expensive components or vehicles equipped with advanced driver-assistance systems.
Before choosing an installer, ask about previous projects, material-specific experience, expected costs, and warranty coverage. A clear discussion of the work can help prevent misunderstandings and unexpected expenses.
Conclusion
Installing and maintaining bodykits can be a rewarding way to personalize a vehicle, but good results depend on careful planning and responsible workmanship. Beginners should prioritize vehicle compatibility, material selection, test fitting, secure mounting, and proper finishing before focusing on appearance alone.
Regular cleaning, inspections, paint protection, and careful driving can help keep exterior modifications in good condition. It is equally important to recognize when specialist assistance is needed, particularly for complicated installations or components that affect vehicle safety.
By choosing suitable bodykits and following a consistent maintenance routine, car owners can enjoy a distinctive exterior while protecting their vehicle’s practicality, reliability, and long-term appearance.